This will open a gallery that provides a variety of styles and templates you can choose from for your timeline. Once there navigate to the Insert tab and select SmartArt from the Illustrations group. Then select Basic Timeline from the Graphic options. To do so go to the Layout tab on the Word ribbon and click on Orientation. Each section of the timeline is highlighted when its value is selected. To create a line place the cursor in the location that youd like to insert it type the three characters for the desired line style then press Enter. Add the same form you previously chose using smartart. Click Insert SmartArt Process. Use AutoFormat to Insert a Line in Word You can quickly insert a line into a Word document with the AutoFormat feature. Then select Insert Smart Art and choose a timeline from the Process section.
Use AutoFormat to Insert a Line in Word You can quickly insert a line into a Word document with the AutoFormat feature. Select the Insert tab and click on the SmartArt button in the Illustrations section. You can change the background color of the timeline color of shape. Select insert smartart or insert a smartart graphic depending on the version of word. Then select Basic Timeline from the Graphic options. With the new blank slide selected click Smart Art and choose a timeline style from the Process menu. The basic timeline starts off with three timeline entries but you can add additional events on the timeline by hitting the Enter key after a. This tutorial will show you how to create a timeline in WordDont forget to check out our site httphowtechtv for more free how-to videoshttpyoutube. Then select Insert Smart Art and choose a timeline from the Process section. Go to the Create from File tab on the Object box click Browse use the Browse box to locate and select the Visio file with vsdx extension click Open check the Link to file box once you are back on the Object box and click OK to insert the Visio drawing to the MS Word file.
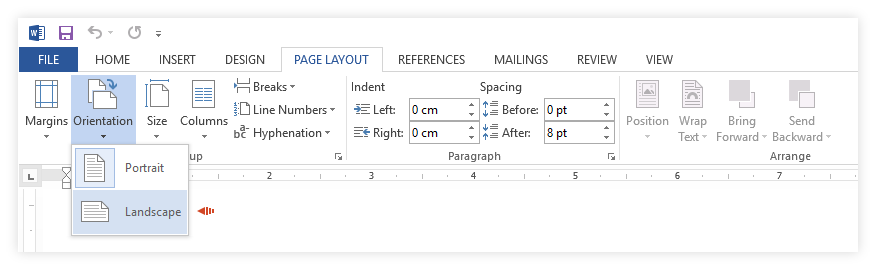
The basic timeline starts off with three timeline entries but you can add additional events on the timeline by hitting the Enter key after a. This will open a gallery that provides a variety of styles and templates you can choose from for your timeline. In your MS Word document go to the insert tab. To do so go to the Layout tab on the Word ribbon and click on Orientation. To add an entry to the timeline you can either double-click on the Text blurbs in the Word document or type directly in the floating box. To do so go to the layout tab on the word ribbon and click on orientation. You may also choose other Graphics templates that suit your needs. To create a line place the cursor in the location that youd like to insert it type the three characters for the desired line style then press Enter. This opens the Lucidchart add-in pane on the right-hand side of your window. Each section of the timeline is highlighted when its value is selected.
Go to the Create from File tab on the Object box click Browse use the Browse box to locate and select the Visio file with vsdx extension click Open check the Link to file box once you are back on the Object box and click OK to insert the Visio drawing to the MS Word file. Select any design you likeit can always be changed easily later. How to Easily Insert the Formatted Date and Time in Microsoft Word In our example were creating a title page for our monthly TPS Report and want to include the current month and year. Start by picking a spot in your document where you want the timeline to go. To add an entry to the timeline you can either double-click on the Text blurbs in the Word document or type directly in the floating box. Once there navigate to the Insert tab and select SmartArt from the Illustrations group. Use AutoFormat to Insert a Line in Word You can quickly insert a line into a Word document with the AutoFormat feature. We can create this as a template that we can use each month to quickly create the cover page or we can just use the same document each month and update the date field. Click Analyze Insert Timeline to add one to your worksheet. Add a blank slide and insert a Smart Art timeline Now go to the Insert tab and add a new blank slide.
A timeline template is inserted into your document along with a floating SmartArt Text pane. Dont worry too much about which. Click on the style you want to use. Click Analyze Insert Timeline to add one to your worksheet. We can create this as a template that we can use each month to quickly create the cover page or we can just use the same document each month and update the date field. Select insert smartart or insert a smartart graphic depending on the version of word. Open a blank Excel document. This tutorial will show you how to create a timeline in WordDont forget to check out our site httphowtechtv for more free how-to videoshttpyoutube. How to Easily Insert the Formatted Date and Time in Microsoft Word In our example were creating a title page for our monthly TPS Report and want to include the current month and year. To do so go to the Layout tab on the Word ribbon and click on Orientation.